

2026 Washington Senior Chess Championship – ROUND 4
There’s a particular kind of chess pain that comes not from losing — but from almost winning. Round 4 of the 2026 Washington Senior Chess Championship was that kind of pain. Gift-wrapped in a neat little bow, handed back.
I was playing as White with the handle Harwood, facing Leonid Gavrysh — a 2015-rated player I had faced before with the White pieces. Twice before, actually. Every time, I trotted out the King’s Indian Attack. Third time unlucky, as it turns out. Going into this game I had 2 points, Gavrysh had 3. A win would have put us both at 3.5 heading into the final round, and I’d have been right in the mix for first place. Instead, I handed him a near-clean sheet and went home still on 2.5.
But here’s the thing: losing this game was entirely optional. At multiple points I had an advantage — sometimes a significant one. I just couldn’t hold on to it. If you’ve ever sat across from a stronger player, clawed your way to a winning position, and then watched it evaporate like morning fog, this one’s for you.
Let me walk you through what went wrong — and more importantly, what you and I both need to learn from it.
King’s Indian Attack: My Go-To System and Its Limits
The King’s Indian Attack is a system I keep coming back to, and for good reason. It’s flexible, it’s logical, and it allows you to get your pieces out without memorizing twenty moves of theory. As White in the King’s Indian Attack, you set up with e4, d3, Nd2, Ngf3, g3, Bg2, and castle kingside — a solid fianchetto formation that can face almost anything Black throws at you. The King’s Indian Attack rewards patient, purposeful play; it punishes laziness and drift.
For a deeper look at how the King’s Indian Attack works in practice, including plans and typical pawn structures, I’d recommend checking out this breakdown at ChessFox. It’s a solid primer that explains why the opening scores well for White even at club level.
I’ve also had some memorable King’s Indian Attack battles on this site before — if you haven’t seen this earlier game where subtle threats decided the outcome, it’s worth a read alongside this one.
The problem with the King’s Indian Attack — and this game exposes it nicely — isn’t the opening itself. It’s what happens when you don’t follow through on its core ideas. You have to commit to the kingside. You have to play actively. Timidity is the enemy of the King’s Indian Attack system. The whole point is to build up quietly, then strike with conviction. And on that score, I came up short. Timid I was.
Lesson 1: Move Order Matters — Don’t Mix Up Your Sequence
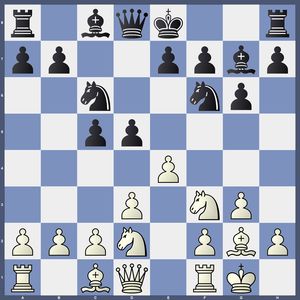
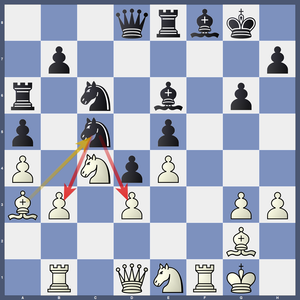
After 1.e4 Nf6 2.d3 d5 3.Nd2, play continued with 3…c5 4.Ngf3 Nc6 5.g3 g6 6.Bg2 Bg7 7.O-O O-O 8.Re1 e5 and we reached a fairly typical King’s Indian Attack structure. On move 9 I played c3, and when Black played d4, I captured with 10.cxd4.
That was already a problem. My own annotation says it plainly: too early. I got my move order mixed up. Knight c4 first — attacking the e5 pawn directly — was the right sequence. The difference matters because after the premature exchange, Black was able to recapture and stabilize the center on his own terms, giving me a slightly weak d3 pawn and a difficult dark-square situation to deal with.
The lesson: In the King’s Indian Attack, the timing of your pawn breaks and exchanges defines the entire middlegame. Move order in the King’s Indian Attack isn’t optional — it’s what separates a comfortable game from a cramped one. Rushing cxd4 before activating the knight is a bit like throwing a punch before you’ve planted your feet.
Lesson 2: Dark Squares Are Real Estate — Don’t Ignore Them
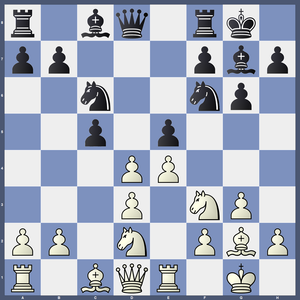
By move 12, after 12.a4, my own notes acknowledge that Black already has an edge. The d3 pawn was weak and my dark squares were coming under pressure. That’s the Silman imbalance framework at work right there: Black had better piece coordination and a structural target to aim at.
The Knight on c5, which Gavrysh achieved on move 16 with a well-timed maneuver, was a monster piece. Centralized, stable, pressuring both b3 and d3 — it was what Jeremy Silman would call a “permanent outpost,” the kind of piece that controls the game just by existing.
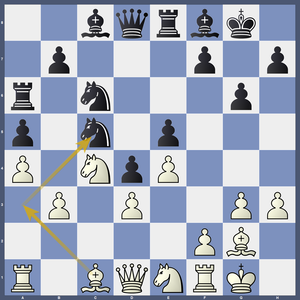
I had a chance to deal with it. On move 17, I played f4 to generate kingside counterplay, but the engine preferred Ba3 to simply eliminate that knight. The note from Stockfish makes it clear: taking the c5 knight leads to rough equality; ignoring it gives Black a lasting advantage.
I knew it was a problem. I chose not to solve it. That’s the kind of thing that stings in retrospect.
The lesson: When your opponent has a dominant outpost piece, make eliminating it your priority — even if it means trading your active bishop for it. A permanent advantage is worth more than temporary piece activity.
King’s Indian Attack and the F-File Promise
One of the key ideas in the King’s Indian Attack is the f4-f5 advance — seizing kingside space and opening the f-file for your rook. In a well-executed King’s Indian Attack, Rf1 is an important preparatory move, and I did get it right on move 15. The rook belongs on the f-file if you’re going to commit to a kingside push.
But after 17.f4 and 17…f6 from Black, I had a fork in the road. The move f5 was available — sharp, thematic, and consistent with the opening’s spirit. I played Rb1 instead. That’s not a blunder. It’s just not the move the position was crying out for.
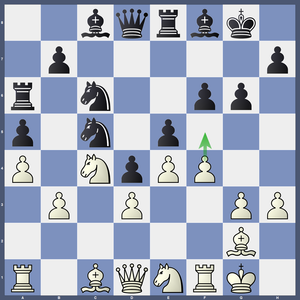
When Black played Be6 on move 18 and I captured on e5 with 19.fxe5, I did open the f-file. Progress! But my note acknowledges that 19…Nxe5, recapturing with the knight, was actually stronger for Black, keeping more pressure on d3.
Lesson 3: When You See the Right Move, Play It
Move 20. Ba3 is on the board. Black plays Be7. I have a long think. The right move is obvious: Bxc5, trading off that infuriating knight and reaching near-equality.
I didn’t play it.
Why? Because I talked myself out of it. I worried — incorrectly — about Black’s bishop on f8-to-a3 diagonal. In retrospect, I wasn’t even attacking on the queenside. My entire plan was a kingside attack. The bishop on the a3-f8 diagonal was doing nothing threatening. There was simply no reason not to take.
Instead I played Nf3, and Black still had the c5 knight sitting there laughing at me.
The lesson: When you’ve identified the right move after serious thought, trust your analysis. Second-guessing a sound plan because of an imaginary threat is a form of chess self-sabotage. If you can’t articulate exactly what you’re afraid of, the threat probably isn’t real.
Lesson 4: Blunders Go Both Ways
Here’s a bit of silver lining: I wasn’t the only one making mistakes.
After some complications, Black committed a serious blunder on move 24 with Bxg2. A strange move — apparently Qb8 was needed to attack the knight and stay off the open c-file. My note calls it an odd blunder. Suddenly I had real winning chances. I took with the king (Kxg2) and the position shifted sharply in my favor.
Then, on move 26, Black played Rd8 — another inaccuracy.
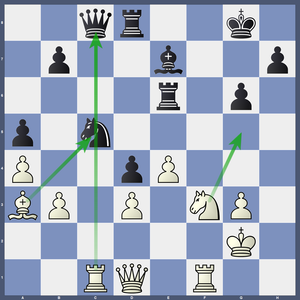
At this point I had a sequence available: Bxc5, followed by Bxc5, then b4(!). That last move is the critical idea. The point of b4 isn’t even to attack the bishop directly — it’s to open the b3 square for the queen. Qb3 would come with an enormous pin on the rook, and Black can’t protect both pieces. If Black tries Rde8, Ng5 wins the rook outright. This was a winning combination.
I didn’t see it. I played Rc4 instead — still better than equality, but not the kill shot.
The lesson: When your opponent blunders into a losing position, you have to be ready to cash in. Winning positions require concrete calculation, not just general pressure. Study combinations that involve quiet intermediate moves — like b4 opening a square rather than directly attacking a piece.
King’s Indian Attack and Endgame Transitions
We reached the endgame — and this is where the wheels really came off. My own annotation doesn’t spare me: “A terrible blunder that sends the game into drawish territory. What lies ahead is my misplaying of the endgame — an area every chess player needs to work on.”
Harsh but fair.
On move 34, with a rook and queen endgame looming, I played Qc4+ rather than the stronger Qc3, which would have maintained a clear winning advantage. Qc3 sets up the Ng4-h6 maneuver and keeps Black tied up. Qc4+ just invites queen trades.
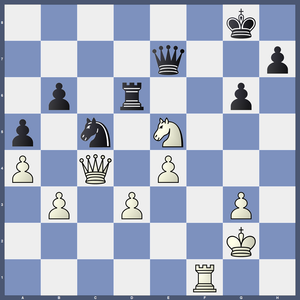
Then on move 35 came the real howler: Qxe6+. I traded queens when I had a winning advantage. The annotation for this move has two symbols — a blunder and an equality sign. That about sums it up. As the notes put it, trading always favors the side that’s defending when you have an extra pawn. There was no reason — none — to make that trade.
The lesson: An extra pawn in a roughly equal-looking endgame is a real advantage. Don’t give it up by trading queens unless you absolutely have to. Every queen exchange when you’re ahead materially is a concession. Think twice before simplifying.
Lesson 5: The Endgame Is a Separate Skill
I’ve said it before on this blog and I’ll say it again: endings are where games are won and lost at club level. The middlegame gets all the glory — the tactics, the combinations, the attacks. But how many games have you thrown away in the endgame? The King’s Indian Attack often transitions into complex rook endgames precisely because the middlegame tension releases gradually rather than with a single explosion. That means you need to be just as alert when the queens come off as when they were on.
This game went from equal after the queen trade to a loss because I mishandled a rook and knight ending. After 36.d4 and some knight maneuvering, by move 42 there was still a shot: Nh3, Rxe4, Nf4 — a sequence that could snag a pawn and keep things equal. I missed it. Instead, the position drifted, I ended up down a pawn, and Gavrysh converted with clean technique.
He had an extra pawn. He marched it down the board. I resigned on move 55.
The lesson: The endgame is not where you relax — it’s where you stay vigilant. A one-pawn advantage at club level converts far more often than it should because the defending side stops calculating precisely. Don’t be that guy. Keep calculating.
Lesson 6: Don’t See Ghosts — Calculate Instead
Around move 28 I started worrying about a knight sacrifice on e4 with pressure on my king. My note calls this what it was: a hallucination. There were no threats like that in the position.
This is a pattern I need to break. When I have an advantage, I start looking for all the ways I can lose it — and sometimes I invent threats that don’t exist. The result? Passive, defensive moves that hand the initiative back to my opponent.
Gavrysh is a good player. He didn’t need my help. But I gave it to him anyway.
The lesson: When you find yourself worried about a concrete threat, calculate it out fully before you react to it. If the threat doesn’t hold up under scrutiny, play your plan. Fear of ghosts is how winning positions become draws, and drawing positions become losses.
Lesson 7: You Have to Be a Contender at the Board, Not Just Near It
Here’s the broader truth this game exposed: I was close to being a genuine contender at this tournament. Beat Gavrysh and I’m at 3.5 going into the final round, tied for the lead. That’s not a fantasy — it was a live possibility for most of this game.
But wanting to be in contention and being ready to be in contention are different things. Contenders see b4 when b4 is there. Contenders don’t trade queens when they’re a pawn up. Contenders trust the position they’ve calculated instead of seeing threats that aren’t there.
I finished with 2.5 points and second place — which is respectable for a 1847-rated player at a Senior Championship. But I know what this game could have been. Chess require mental stamina. One needs to be patient but also relentless.
3 Key Takeaways
1. Solve your opponent’s strong pieces, not around them. That knight on c5 was the story of the middlegame. I danced around it instead of eliminating it. If your opponent has a dominant outpost piece, removing it — even at the cost of your own active piece — is almost always the right call. Reference: Silman’s How to Reassess Your Chess covers outposts and minor piece imbalances in depth. It should be on every serious club player’s shelf.
2. When you’re winning, trade pawns — not queens. The endgame flip came from a single decision: Qxe6+. Up a pawn, in a position where my queen was active and his was passive, I traded them away for no reason. The general principle is simple — when you’re ahead, simplify material (trade pieces) rather than positional advantages (don’t give away queen activity for nothing). Rook and pawn endgames punish this more than almost any other ending type.
3. Spot the quiet intermediate move. The b4 idea — not to attack the bishop directly but to open the b3 square for the queen — is exactly the type of move club players miss. The combination was there. The candidate moves were there. The problem was not seeing a move that doesn’t immediately grab material. Start asking yourself in every position: is there a quiet move that transforms everything? Train this with tactics puzzles focused on intermediate moves (also called “zwischenzugs”).
A good place to start building your tactical vision is ChessFox’s King’s Indian Attack resource — a useful guide to the opening’s core ideas. More importantly, start reviewing your own King’s Indian Attack games. That’s where the real lessons live.
What’s Next
I still had one round to play at the 2026 Washington Senior Chess Championship — and I was going to be paired against someone rated over 2000. After a game like this, the temptation is to play cautiously, consolidate, protect the 2.5 points. But that’s not the mindset I’m bringing to the board.
The 2200 target isn’t going to hit itself. And the King’s Indian Attack is still my weapon of choice — I just need to wield it better.
Please feel free to share your experiences in tournament play. I know I’m not the only person out there that gets a win stolen from me.
Leave a comment or send me an email to paul@betterchess.net, I would love to hear from you.